
Working in IT facilitates some good benefits such as cheap equipment and free software. With this in mind, I’ve decided to go on a journey of trying to self host everything instead of paying for cloud based hosting of applications and storage.
Whilst i already have a storage server (TrueNas) and two small Lenovo servers that host the critical home stuff and a custom home network, i needed a place that will enable me to spin up and down and test new software, virtual environments and anything else i want without having to break my core network. The idea behind the lab is to enable no interruption of the home when im playing around and breaking stuff.
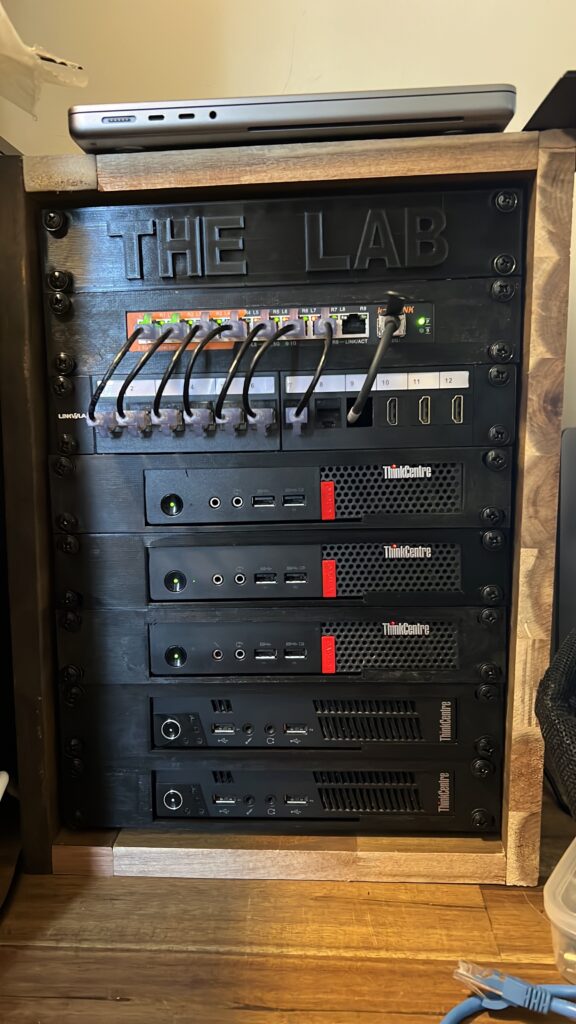
The End result was a custom built 10″ Rack housing a 3 Node VSphere cluster with a cheap 8 port 2.5Gb switch that has a 10Gb uplink port that is connected into my core 10Gb Mikrotik switch.

Whats in the rack!
From top to bottom:
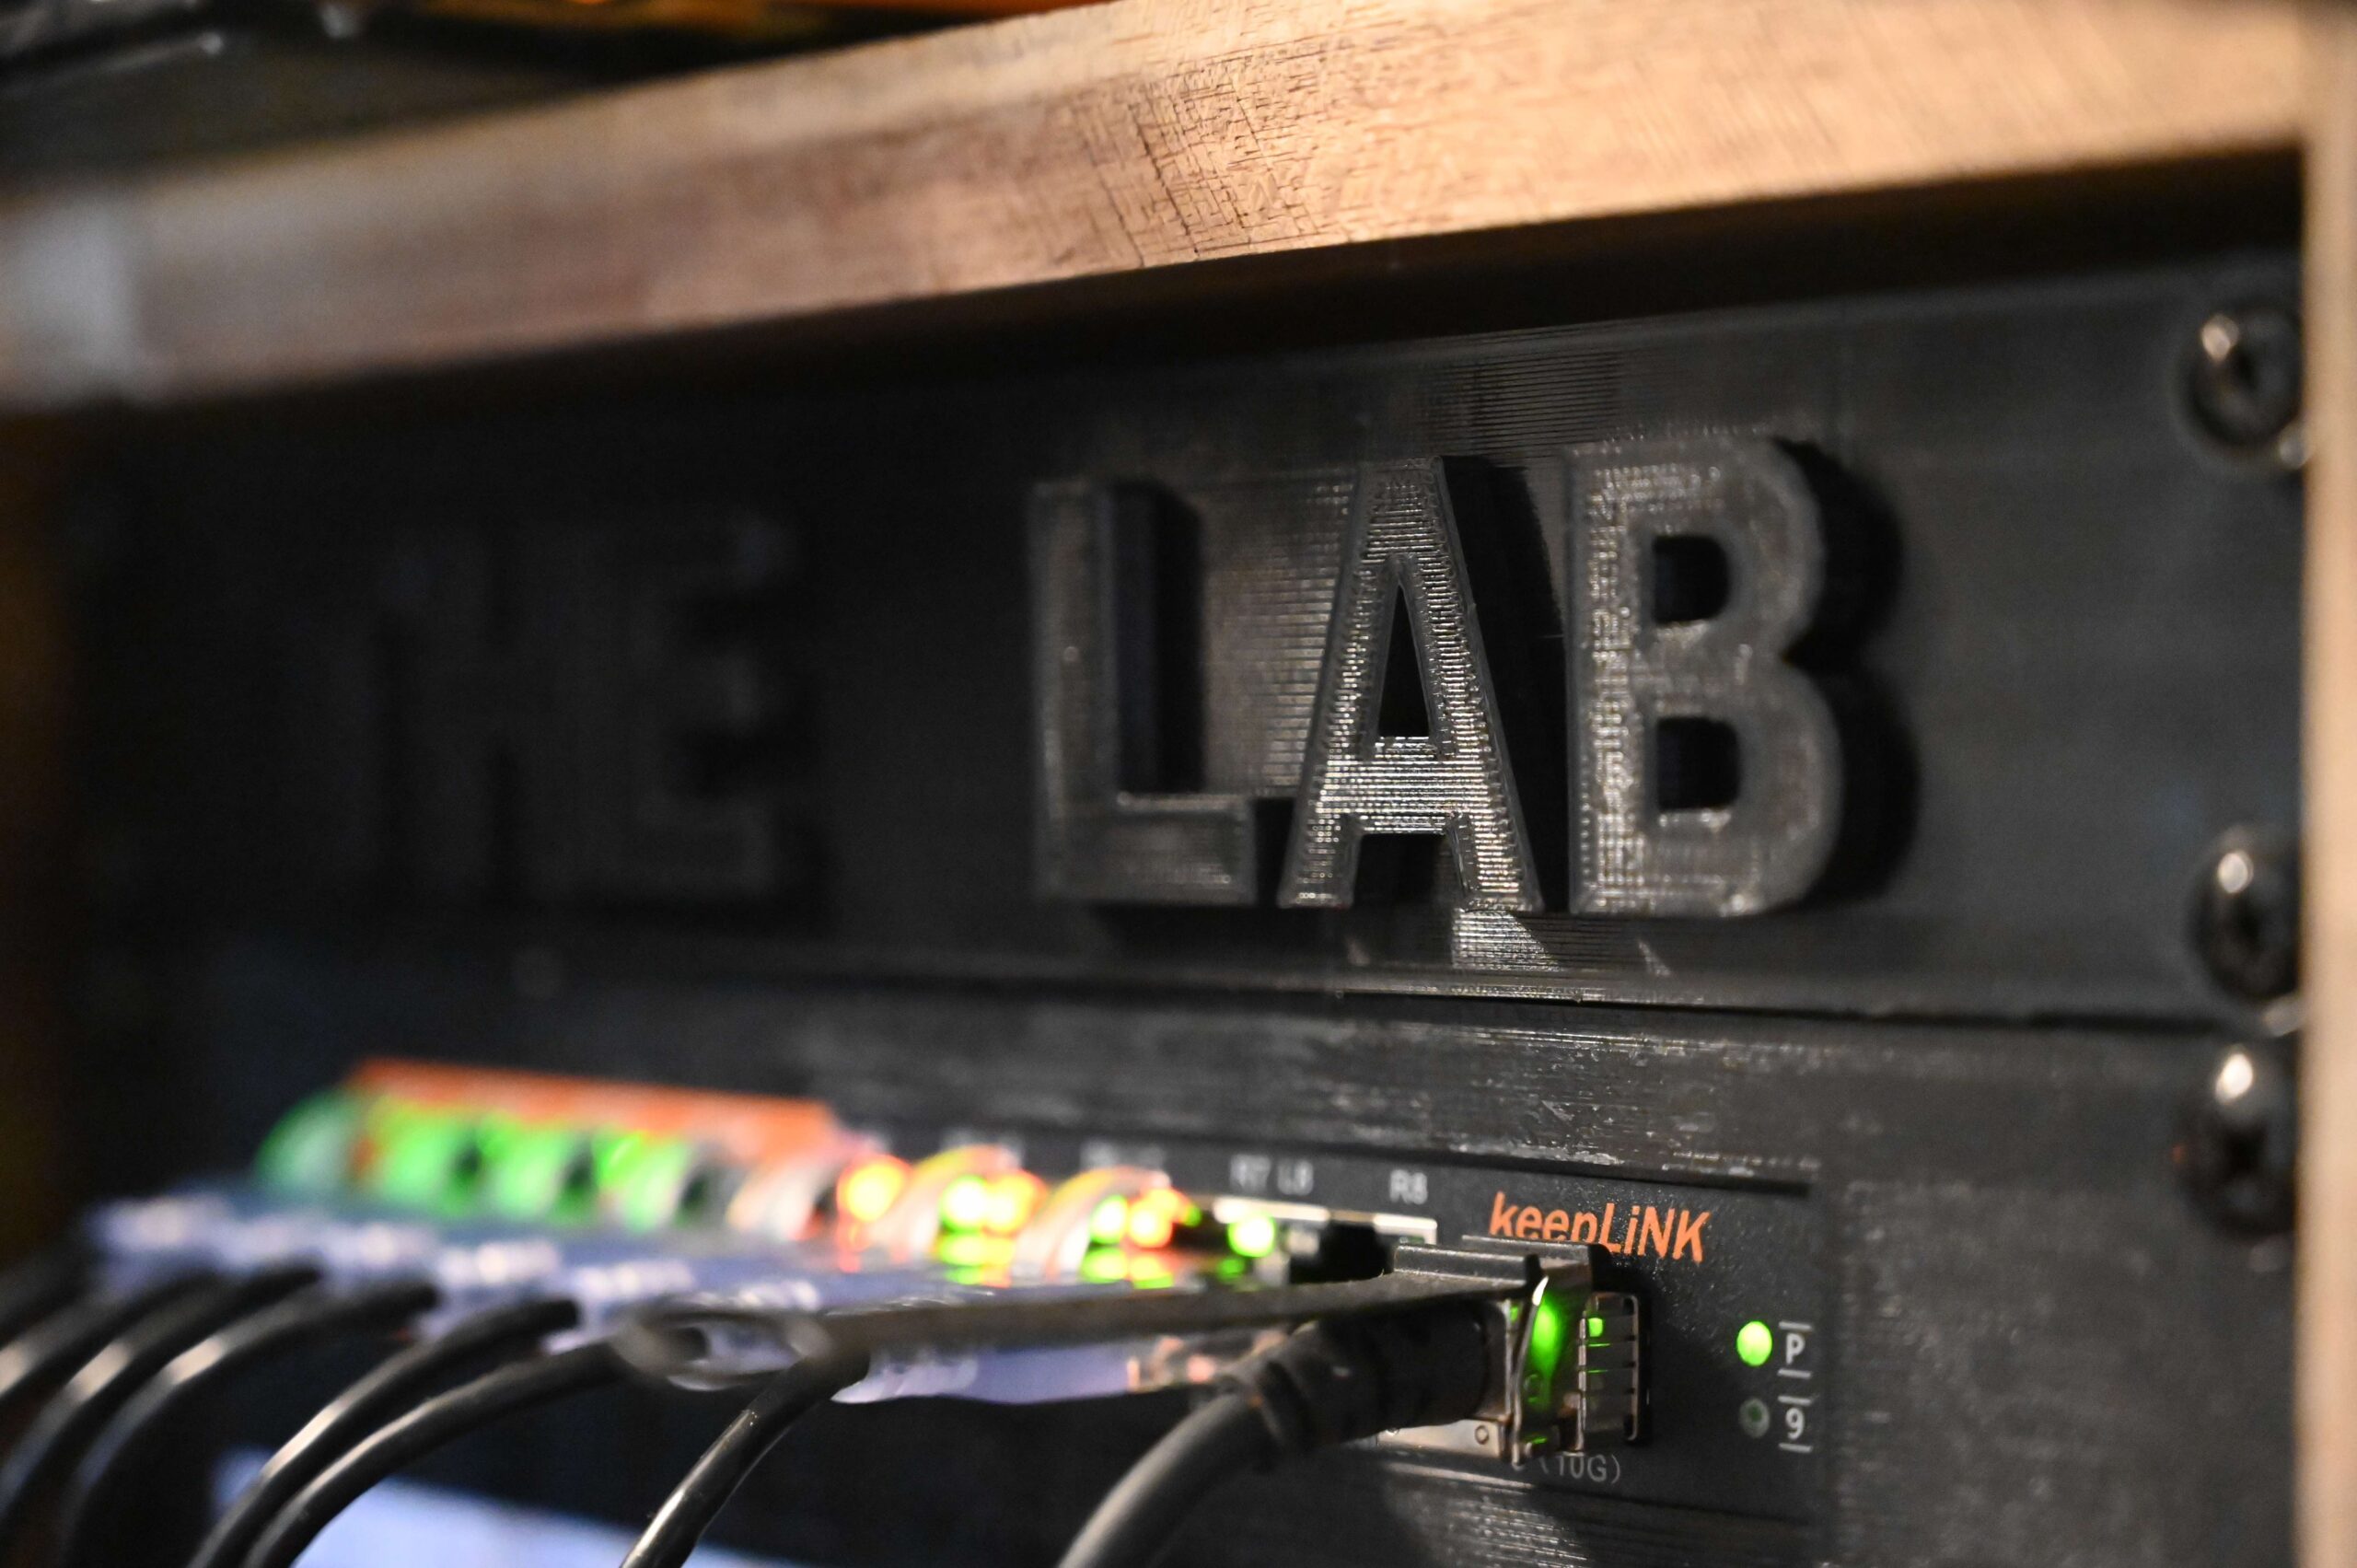
- 3d Printed “THE LAB” 1 RU blanking plate
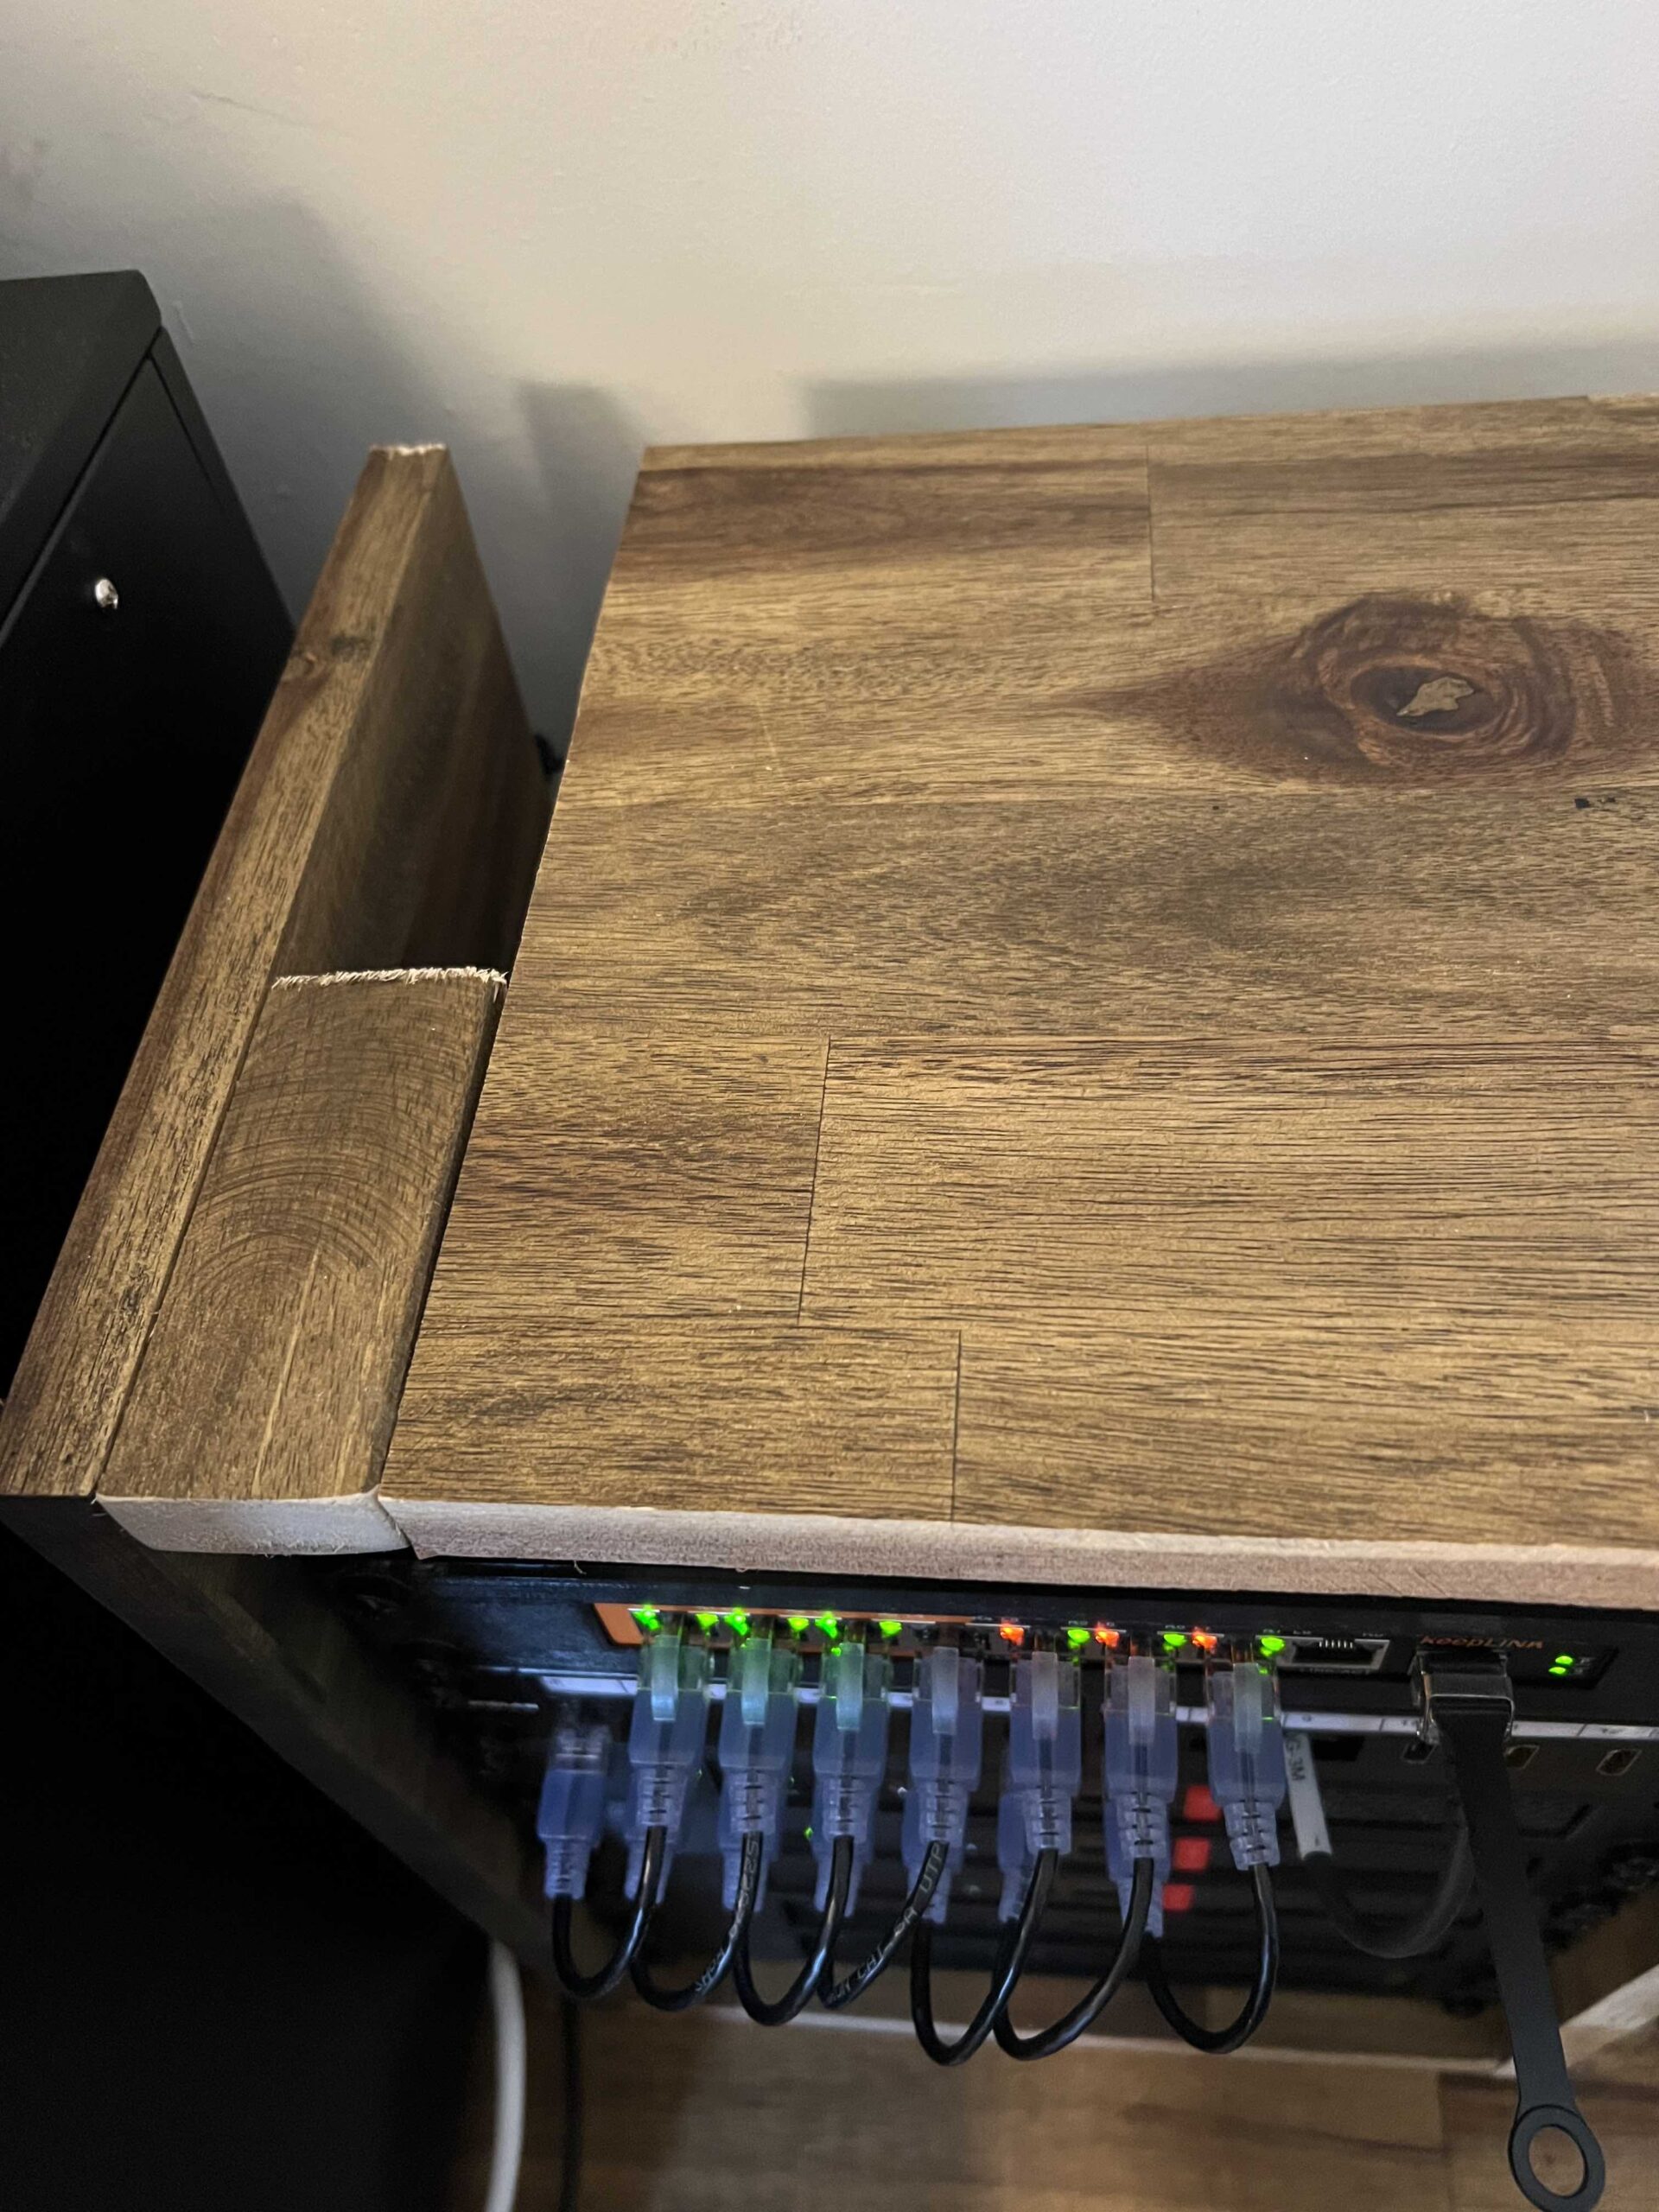
- Keep Link 8 Port Multi-Gigabit (2.5Gb/s & 1Gb/s) Switch
- AliExpress KeyStone 10″ 12-Port 1U Patch Panel with cat6A Keystones and HDMI Keystones
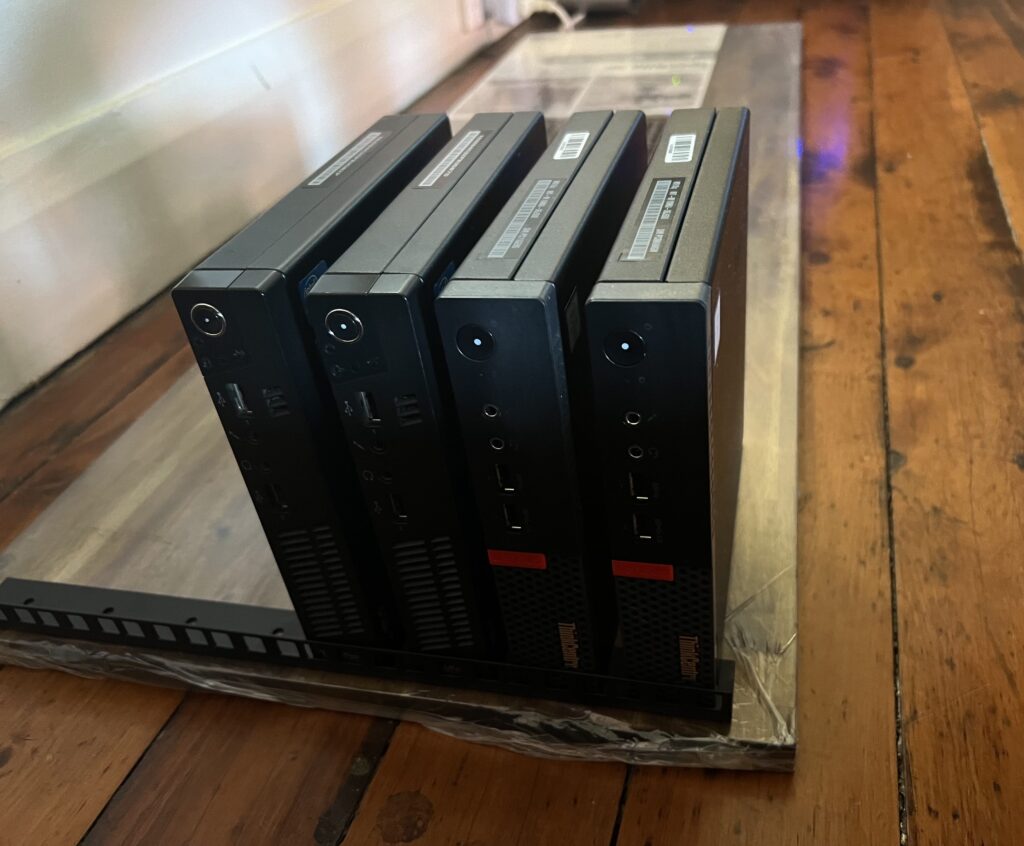
- Lenovo M710q Tiny
- Intel i5 6500t, 16Gb Ram, 256gb SATA SSD,16GB USB for the ESXi Install
- Lenovo M73q
- RU 2 – i5-3470t, 16Gb ram, 128GB SATA SSD
- RU 1 – i7-3770, 16Gb, 128Gb SATA SSD
Costs
Overall, i managed to get away with only spending $637AUD for everything which i think was pretty good for a 12 core, 48Gb, 2.5Gb Virtualisation Cluster.
For the Lenovos themselves, i managed to find 2 for sales on FB Marketplace for $90 each with 8GB ram (Hence to 2 extra 8Gb ram Sticks) which was a bargain but in order to create the 3 node cluster i had to buy the third one from eBay which was $169 with 16gb Ram included. Everything else was pieced together from AliExpress and Ebay. Exact Costs are below.
| Item | Item Cost | Quantity | Total |
| KeepLink 8 Port Switch | $86.99 | 1 | $86.99 |
| Ebay Lenovo | $169.00 | 1 | $169.00 |
| 8 GB Ram Stick | $25.00 | 2 | $50.00 |
| Keystones Cat6ax10 | $10.12 | 1 | $10.12 |
| Keystones HDMI X4 | $3.11 | 4 | $12.44 |
| USB 3 2.5Gb | $15.50 | 4 | $62.00 |
| Patch Panel | $25.43 | 1 | $25.43 |
| 8RU rails | $12.90 | 1 | $12.90 |
| Bunnings Bench | $29.00 | 1 | $29.00 |
| Lenovo Facebook | $90.00 | 2 | $180.00 |
| Total | $637.88 |
I really like the idea of compact compute nodes and r/homelab, Level1Techs and Serve the Home were all great resources for me to figure out what i should get. I also didn’t want to spend a lot of money so second hand machines, AliExpress and Ebay were my go to in order to keep the cost down.
The Build
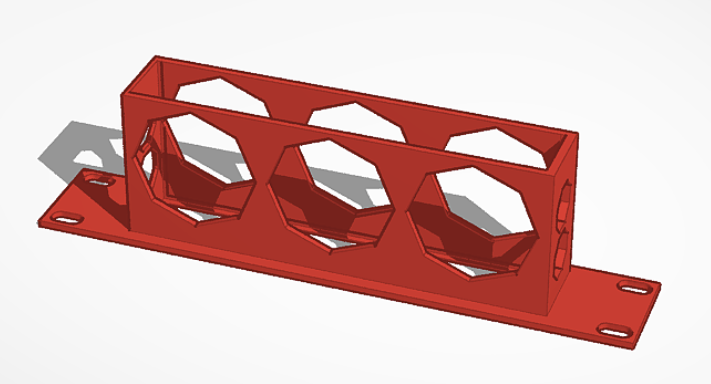
I was inspired by all the 10″ rack builds happening reciently on r/homelab but this guy on r/homelab gave me some inspiration! He bought some Dell Micro nodes for the same reason of creating a homelab of his own but took it a little further.
He and his wife decided to work on the lab together and his wife designed 3d models for the 10″ computer rack mounts, they even posted the build on their website and shared the STL’s for me to print myself! (Here is their website), So i got printing 3 of those to throw my Lenovos in.
Whilst the days and days of 3d Printing occurred, i ducked off to Bunnings to buy the wood for the outer shell. Its $29 for a 1200x400x20 plank of wood and i got to measuring out (badly) the cuts that i needed to make to create the outer shell.
I say badly because i deal in the metric system (being from the rest of the world that isnt the US) and didn’t measure twice and cut once so my 10″ rack was about 3.4cm’s short of 10″ (lol the math doesnt even work to get anything resembling 10 Inches anyway). Not to worry though, the off cuts saved the day.
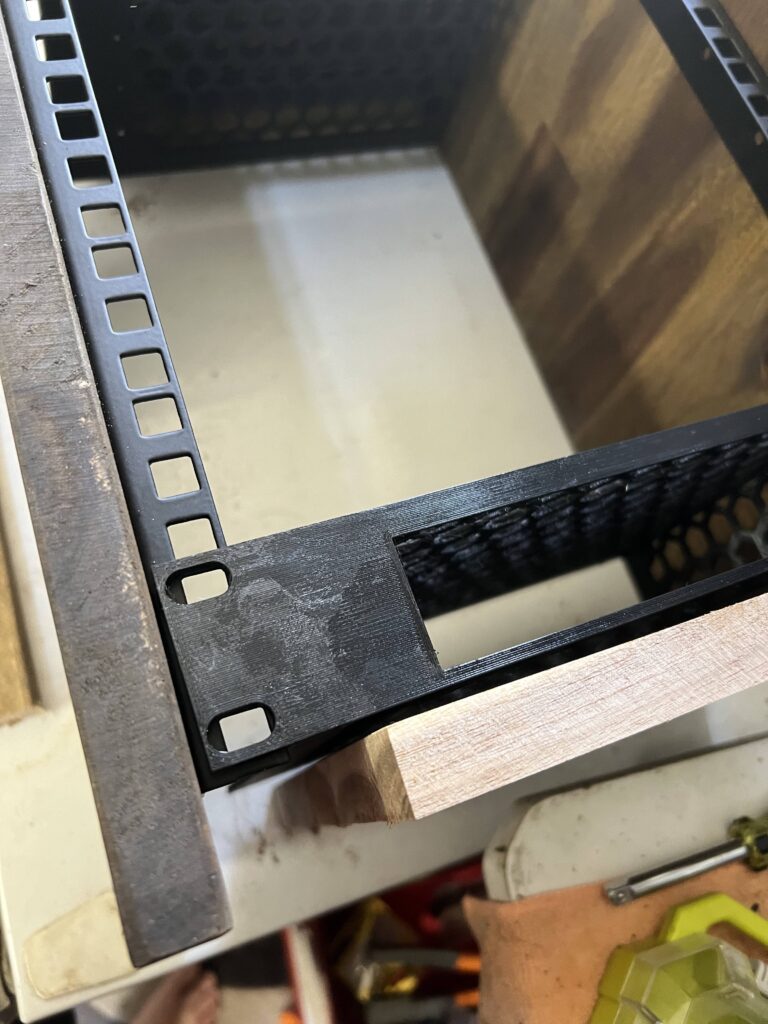
Once i got chassis put together with the rails attached, i started mounting the patch panel and 3d printed mini PC mounts.
The wife of the guy who posted the 3d mounts did an amazing job of designing them. They are slightly of center when you look at them but its by design in order to be able to mount the power supplies on the sides. This is a great idea and execution was excellent for the lenovo PC’s, even with the 90w adaptor that is quite large!
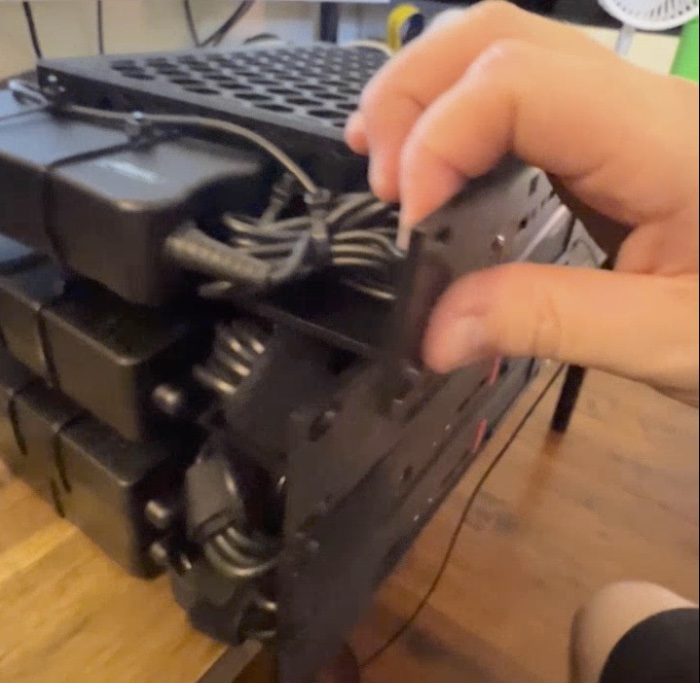
After mounting most of the PC’s and still having one more still printing, i decided to start getting it all wired up to see if it all work and it all worked like a dream. I started installing VSphere on the nodes and everything started to come up quite well.
I didn’t have a 3d printed mount for the Switch so i decided to delve into this design myself. I measured it all up IRL and opened up tinkercad and started figure out the design.
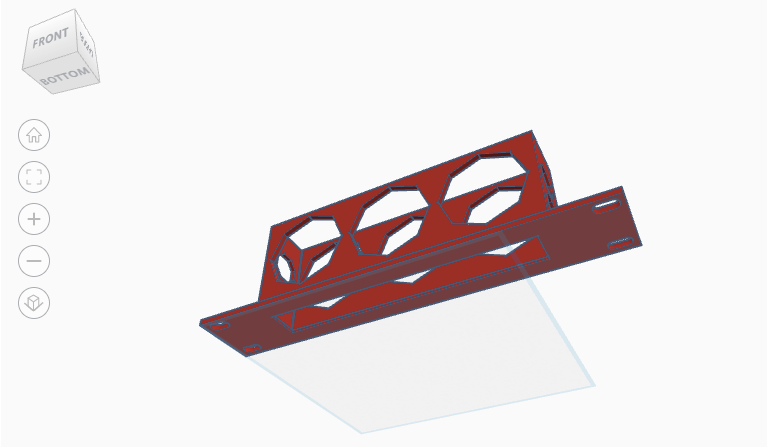
I think i did an alright job for a first time designing something and it seems to be working really well. Its a bit tight when you slide the switch but a bit of friction means when plugging the Ethernet cables in it doesn’t slide out.
Connectivity
I’ve been watching ServerTheHome.com Tiny/Mini/Micro Series as well as their 2.5Gb Eth Switch series on youtube. Even though my whole switch setup is all Mikrotik, Mikrotik didn’t have an 8port 2.5Gb switch with a 10Gb uplink port at the time i needed one (They l released the crs310_8g_2s_in 2 weeks after i finished this project LOL ) so decided to take the gamble on AliExpress and grabbed the keepLINK one you see in my setup.
Its 8ports of 2.5GbE with a single 10Gb SFP+ uplink that feeds into my CRS309-1G-8S+IN core switch. My TrueNAS box also feeds into this 10Gb Switch and will host the shared datastores for the cluster to ensure HA and Availability incase of a node shutdown.
HyperVisor
Being a Systems engineer previously, i am most conformable with VMware, and being in the industry, there are perks of NFR licenses that can be utilised for homelabs such as these.
I run ESXi 8.0U2 on all 3 nodes within this cluster with VCenter over the top (in Tiny deployment mode) to run the cluster. Ive decreased the resources of the VCenter VM slightly to ensure i can run some other services on that host which seems to be working well.
The most interesting part of this build with regards to the hypervisor is the 2.5Gb USB Nic’s. I used to run these on my old servers but sadly within ESXi 8 VMware have removed the ability to run the old drivers. Apparently a change in the kernel for Vmware 8 has drop support for a huge amount of NIC’s adn the manufactures need to re-write the drivers apparently to get them supported on ESXi 8.
Luckly, old mate William Lam gave everyone great news that the FLINGS are back and there are new FLINGS that can be utilised within ESXi 8 for realtec USB based 2.5Gb NIC’s! William did a great write up on how to get these functional within ESXi 8 and i followed this to get it all functional.
One thing to note here, if you go down this USB 2.5Gb path, make sure you do the part to ensure the USB Bindings stick on reboot for your VSwitch to persist with the NIC.
2 responses to “Home Lab”
Awesome 👌 👏
Thanks Mate! Its been a good little project to star my self hosting journey on! Let me know if you need an offsite backup!